General
Best Practices
Helpdesk Request Form
Welcome
Event Procedure
Lab Closure Procedure
Links
Resource Drive Conventions
Resource Map
Shipping (FedEx)
Shipping (International)
Suggestion Box
Support Article Guidelines
Information Technology
Email & Calendar
Calendar Resources
Email Groups
Email Overview
Email Signatures
Google 2-Step Verification
Google Calendar Overview
Phishing
Yubico Security Keys
Print & Fax
Software
1Password
Adobe Acrobat DC
Adobe Creative Cloud
ArcGIS
Colby VPN
Combine PDFs in Adobe Acrobat
Excel Trust Settings
Install Falcon Antivirus
Microsoft Office
Microsoft Office Runtime Error Fix
Slack
Software Resources
Uninstall OpenVPN
Windows 10 - Restore from backup
Account Access
Artificial Intelligence (AI)
DNS
Data Storage and Computer Backups
Desk Phones
Filling PDFs
Google Drive
HPCC and Storage Proposal Information
Laptop Recommendations
Migrating data from Storage to Google Drive
Passwords
Restoring Files
Status
Storage
VPN
Vendor Access
Website Request
WiFi
Zeiss Digital Classroom
HR & Payroll
Paid Time Off
Payroll Overview & FAQ
Personnel Offboarding
Personnel Onboarding
Timesheet Approval (supervisors)
Timesheets
Facilities
Finance
Admin
Budget & Reports
Invoicing
Policies & Procedures
Advancement Entry of Donations and Pledges
Corporate Traveler / Melon
Gas and Cryo-Supply Ordering Process and Form Link
Purchasing Flowchart - for staff reference
Purchasing Policy
Vendors Exempt from Purchase Orders
Proposals
Purchase & Expense
Bill/Invoice Approval
Creating a Bill to be Paid
Equipment Capitalization Help
Expense Report
Expense Report (example)
Non-Employee Reimbursement
Purchase Order
Purchase Order (example)
Purchase Order (supplemental)
Recurring Purchase Order (SRS)
Amazon.com
Approval Reminders
Business Office Orientation
Capital One - Corporate Credit Card
Customize Dashboard
Dashboard (SRS)
NetSuite FAQ
NetSuite Login
NetSuite Shortcuts
Revenue Flow Chart
StaplesAdvantage.com
Workshop, Training Projects, and Participant Support Help
Computing
Software
AAI Calculation
ANI Calculation
AlphaFold
Anvi'o
Conda environments
Jupyter notebook
Prokka
RStudio
dada2
sag-mg-recruit
Job management
Charlie Overview
Connect to Charlie
Edit with VS Code
Getting Started
Monitor jobs
Software modules
Transfer files
Zoom
Zoom Overview
Zoom Room Instructions
Closed Captions
Join Teams or WebEx meeting from a Zoom Room
Schedule a Zoom Meeting
Screen Share (Dummy HDMI)
Screen Share (Presenter Mode)
Sign Up and Download Zoom
Zoom AI Companion
Zoom Room: Alfond Room
Zoom Room: Commons
Zoom Room: Conference Rooms
Zoom Room: Forum and Classrooms
Zoom Room: Sage Meeting Room
Zoom Room: Teaching Laboratory
- Home
- Information Technology
- Email & Calendar
- Email Overview
Email Overview
Updated
Schedule Emails
- When you are finished writing the email, click on the up arrow next to the Send button.
- Click Schedule send.
- Select a date + time to send the email.
- That's it. Gmail will automatically send the email at the specified time even if your computer is turned off.
Email Filters & Rules
- Open Gmail in your web browser
- Click on the icon in the top right
- Click on Settings
- Click on the "Filters and Blocked Addresses" tab
- Click on "Create a new filter" link
- Enter the parameters for your filter. E.g.
- To: deliveries@bigelow.org
- Doesn't have: kevin, guay, it
- Click on "Create filter"
- In the background you will see a search using your filter parameters
- Choose an action for the emails that match your filter (e.g. Skip the Inbox and Apply the label: Deliveries)
- Click "Create filter"
- This will add the filter to your list in settings. You can always edit and delete extant filters.
Email Headers
- Open Gmail
- Open the email that you want to check the headers for
- Next to reply , click the vertical ellipse
- Click on "Show original"
- Click Download Original
- Send an email to it@bigelow.org OR reply to an existing helpdesk ticket with the downloaded file as an attachment
Staff Minus One Email
Send an email message to all but one (or more) staff members the easy way:
- In Google Calendar, click on an all-staff event - All Hands Meetings, for example.
- Mouse over the area to the right of the number of guests, the icon for "Copy guest emails" will appear.
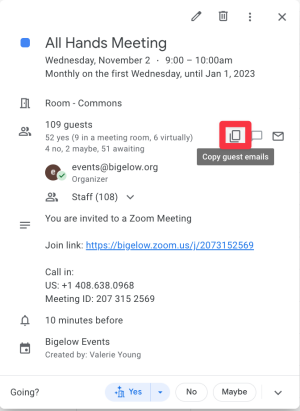
- Click that icon to copy the email addresses of the all staff email group
- Open your email client and create a new email message
- Paste the email addresses you just copied into the To: field
- Delete any email addresses that you don't want to receive the email
- Compose your message and send.
Using Outlook with Gmail
- Sign into the Gmail account you wan to use with Outlook.
- Click on your account in the upper right hand corner (see screenshot below)
- Click "Google Account"
- Click "Sign -in & Security"
- Click "App Passwords"
- Enter the password for the account
- Click the drop down under "Select App" and select "Other (Custom name)
- Type in "Outlook" and click "Generate" (DO NOT CLOSE THIS WINDOW)
Create an Email Group
- Sign into your bigelow.org gmail account
- Select the Google Apps menu in the top right and choose Groups
- Select create group in the top left
- Enter the group name, group email, and group description
- Choose privacy settings.To allow the public to send emails to this group, set "Who can post" the farthest to the right.
- Add members to your group
- Select Create group
- The group has now been created. Select Go to group to view the newly created group
- Additional members can be added later within the My groups section by selecting the Add members icon

In Outlook
- Click "Tools" > "Accounts" > "Add email account"
- Enter the email address and click "Continue"
- Select "Gmail" as the provider if prompted
- Enter the app password that you generated for the account and click "Add account"
- Click "Done"